DIY Dictionary: Understanding Feathering in Home Improvement
Master the feathering technique: Essential guide for smooth finishes in drywall, paint, and flooring projects.

DIY Dictionary: Feathering – Master This Essential Finishing Technique
Feathering is one of the most important techniques in the DIY homeowner’s toolkit, yet many people don’t fully understand what it means or why it matters. Whether you’re working on drywall repairs, painting projects, or other finishing work, feathering is the key to achieving professional-looking results. This comprehensive guide will walk you through everything you need to know about feathering, including what it is, why it’s essential, and how to master the technique for your next home improvement project.
What is Feathering?
Feathering is a finishing technique used to create smooth, gradual transitions between different surfaces or materials. The term comes from the way the edges blend together like the feathers on a bird’s wing—gradually tapering from thick to thin until they seamlessly merge. In practical terms, feathering involves gradually reducing the thickness of a material (such as spackling compound, joint compound, or paint) as you move away from the center of a repair or application, creating a slope that eventually blends into the surrounding surface.
The primary purpose of feathering is to eliminate visible edges or transitions that would otherwise create an uneven or patchy appearance. When done correctly, feathering makes repairs invisible and creates a continuous, smooth surface that’s ready for finishing touches like painting or staining.
Why Feathering Matters in DIY Projects
Understanding the importance of feathering can transform your DIY projects from looking amateurish to looking professionally done. Here’s why this technique is so crucial:
- Creates seamless transitions: Feathering ensures that repairs blend naturally into existing surfaces, preventing visible lines or edges.
- Improves paint adhesion: Properly feathered edges provide a smooth surface for paint to adhere to, resulting in more uniform coverage.
- Reduces sanding requirements: While some sanding may still be necessary, feathering done correctly minimizes the amount of post-work cleanup needed.
- Enhances durability: By creating proper transitions, feathering helps prevent cracking or separation at repair edges.
- Saves time and money: Mastering feathering techniques means fewer do-overs and less material waste.
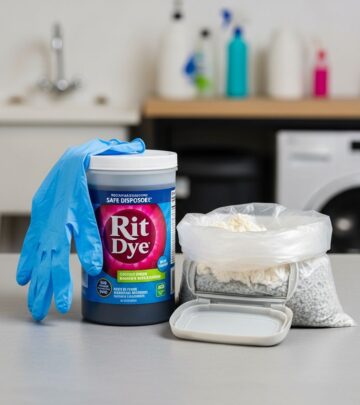
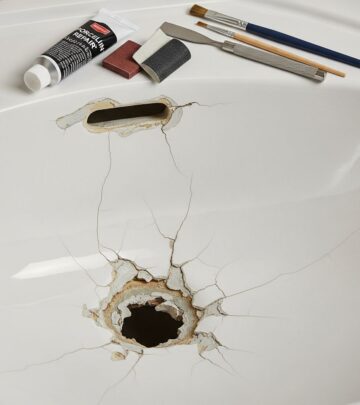
Feathering in Drywall and Spackling Repairs
One of the most common applications of feathering is in repairing drywall damage and filling holes or dings with spackling compound. This is where the technique truly shines, as it allows homeowners to make repairs that are virtually undetectable once painted.
The Feathering Process for Spackling
When working with spackling compound on drywall, feathering involves applying the compound in layers, with each layer extending slightly further from the center of the repair. Start by filling the hole or damage with spackling compound using a putty knife. Work the compound well into the damaged area, ensuring it fills the void completely. Once the initial layer has dried, apply a second, wider layer that extends beyond the first application. Finally, apply a third, even wider layer that feathers out gradually to blend with the surrounding wall surface.
The key to successful feathering with spackling is using the right tools and techniques. A flexible putty knife is essential—rigid knives don’t allow for the gradual tapering that feathering requires. Use light pressure and smooth, controlled strokes to create a gradual transition. The wider your final feathered edge, the less noticeable the repair will be, as the transition will be more gradual and less likely to catch light.
Common Mistakes to Avoid
Many DIYers make mistakes that prevent their feathering from looking professional. One common error is not feathering the edges wide enough. A repair that feathers out only a few inches will still show a visible edge. Professionals typically feather out to 12 to 18 inches or more for larger repairs. Another mistake is applying too much compound at once, which leads to cracking as it dries. Building up multiple thin layers creates stronger, more seamless results. Finally, avoid using a rigid putty knife or applying too much pressure, as this prevents the gradual taper that makes feathering work.
Feathering Techniques for Painting
Feathering is equally important in painting applications, particularly when blending new paint into existing painted surfaces or when working with primer and topcoats. The technique helps avoid lap marks and ensures uniform color coverage.
Feathering Paint Edges
When painting, feathering involves overlapping strokes in such a way that the edges of new paint gradually blend into already-painted areas. This is particularly important when you’re working on a section and need to maintain a wet edge to avoid visible lines. As you apply paint to a new section, slightly overlap your brush or roller strokes into the previously painted area, feathering out the paint so there’s no sharp demarcation line.
The technique also applies when using masking tape. Rather than removing the tape immediately and leaving a hard edge, some painters feather the edge by painting just slightly beyond the tape line and then lightly feathering that edge with a dry brush or by lightly sanding after drying.
Feathering for Primer and Topcoat Applications
When applying primer over repairs and then adding topcoat paint, feathering becomes essential. Feather your primer application beyond the edges of the spackling or repair work. This creates a gradual transition from the bare drywall or repair area to the rest of the wall. When you apply the topcoat paint, feather it similarly to create an even more seamless blend. This multiple-layer feathering approach virtually eliminates any chance of seeing the repair through the final paint finish.
Feathering in Other DIY Applications
While drywall and painting are the most common applications, feathering principles apply to many other DIY projects.
Flooring and Surface Finishes
In flooring projects, feathering is used to create smooth transitions between different floor heights or when blending wood stains and finishes. Self-leveling compounds used in concrete or subfloor preparation often incorporate feathering principles, gradually sloping from thicker to thinner applications to create level surfaces.
Caulking and Sealant Applications
When applying caulk or sealants, feathering helps create a clean, professional appearance. Rather than leaving a uniform bead of caulk, feathering it out at the edges creates a more seamless integration with the surfaces being sealed. This is particularly important in high-visibility areas like crown molding or trim work.
Texture and Specialty Finishes
Textured finishes and specialty coatings also benefit from feathering techniques. Whether you’re applying popcorn texture, knockdown finishes, or specialty wall coatings, feathering the edges ensures the new finish blends naturally with existing surfaces.
Tools and Materials for Feathering
Having the right tools makes feathering easier and produces better results. Here’s what you should have on hand:
| Tool/Material | Purpose | Key Features |
|---|---|---|
| Flexible Putty Knives | Applying and feathering spackling compound | Available in 2-4 inch widths; flexibility is crucial |
| Spackling or Joint Compound | Filling drywall repairs and damage | Use quick-dry or lightweight varieties for easier sanding |
| Sandpaper (120-220 grit) | Smoothing feathered edges between coats | Finer grit produces smoother final results |
| Paintbrushes and Rollers | Applying paint with proper feathering technique | Quality brushes create smoother edges |
| Taping Knives (6-12 inch) | Feathering larger repairs and compound applications | Larger knives create wider, more gradual feather edges |
| Drywall Sander (optional) | Smoothing large feathered areas | Speeds up finishing for extensive repairs |
Step-by-Step Guide: Feathering a Drywall Repair
Follow these steps to achieve professional feathering results on your next drywall repair project:
Step 1: Assess and Prepare the Damage
Examine the damaged area and remove any loose drywall material or debris. If the hole is jagged or has raised edges, lightly sand or smooth them down. This creates a better base for your spackling compound.
Step 2: Apply the First Coat
Using a flexible putty knife, apply the first coat of spackling compound directly into the hole or damage. Press firmly to ensure the compound fills the entire void and makes good contact with the surrounding drywall. Smooth the surface as much as possible, but don’t worry about feathering at this stage—focus on filling the damage completely.
Step 3: Allow Drying and Light Sanding
Allow the first coat to dry completely according to the compound manufacturer’s instructions. Most lightweight spackling compounds dry within 30 minutes to 2 hours. Once dry, lightly sand the area with 120-grit sandpaper to smooth any rough spots and create a surface for the next coat to adhere to.
Step 4: Apply the Second Coat with Feathering
Apply a second coat of spackling compound, extending it about 2 to 3 inches beyond the first coat in all directions. Use light pressure on your putty knife, gradually reducing the thickness as you move away from the center of the repair. The compound should taper gradually and almost imperceptibly into the surrounding wall surface.
Step 5: Final Feathering Coat
Once the second coat is dry, apply a third, final coat that extends even further—up to 6 to 12 inches beyond the original damage in all directions. This final coat should be very thin at the edges, barely visible as you feather it out. Use minimal pressure and smooth, flowing strokes to create the smoothest possible transition.
Step 6: Sand Smooth
After the final coat dries, sand the entire feathered area with progressively finer sandpaper. Start with 120-grit, then move to 150-grit, and finish with 220-grit for the smoothest surface. Sand in circular motions to avoid creating directional scratches.
Step 7: Prime and Paint
Apply a coat of primer over the entire repaired area, feathering it out to blend with the existing wall surface. Once the primer is dry, apply your topcoat paint, again feathering the edges to ensure a seamless blend.
Pro Tips for Perfect Feathering
- Wider is better: Don’t be conservative with your feather edge. The wider you feather, the less visible the repair will be. Professional painters and finishers often feather repairs 12 to 18 inches or more.
- Use proper lighting: Work in areas with good lighting so you can see gradual transitions. Even better, use a work light to cast light at an angle across the surface—this reveals imperfections you might otherwise miss.
- Invest in quality tools: A high-quality, flexible putty knife makes an enormous difference. Cheap, rigid knives won’t allow for the gradual tapering that feathering requires.
- Multiple thin coats beat fewer thick coats: Building up several thin layers creates stronger, smoother results than trying to cover everything in one or two thick applications.
- Test your edges: Run your hand across the feathered area (after it dries) to feel for any ridges or irregularities. If you find any, they’ll likely show through paint.
- Sand between coats: Light sanding between coats helps subsequent coats adhere better and creates smoother transitions.
- Practice makes perfect: Start with small repairs to build your feathering skills before tackling larger damage areas.
Frequently Asked Questions About Feathering
Q: How wide should I feather an edge?
A: The wider the feather edge, the less noticeable the repair. For small holes or damage, feather at least 6 to 8 inches beyond the original damage. For larger repairs, feather 12 to 18 inches or even more. Professional results typically involve extensive feathering that creates very gradual transitions.
Q: Can I feather with regular joint compound instead of spackling?
A: Yes, joint compound (drywall mud) actually feathers better than spackling in many cases. It’s lighter, sands more easily, and creates excellent gradual transitions. The trade-off is that it takes longer to dry than quick-set spackling products.
Q: Do I have to sand between each feathering coat?
A: Light sanding between coats is recommended but not absolutely required. However, it helps subsequent coats adhere better and creates smoother, more seamless transitions. At minimum, sand the final coat before priming and painting.
Q: What if my feathered edge still shows after painting?
A: This typically means you haven’t feathered wide enough or smoothly enough. Apply additional coats of spackling compound, feathering them even wider. You can also apply additional primer coats, feathering those as well, before applying the final topcoat of paint.
Q: Is feathering only used for drywall repairs?
A: No, feathering principles apply to many finishing applications including painting, staining, caulking, textured finishes, and flooring. The fundamental concept of creating gradual transitions applies across many DIY and professional finishing projects.
Q: What’s the best putty knife width for feathering?
A: Start with a 2 to 4-inch knife for applying spackling into the damage. For feathering out the edges, use larger knives—6 to 10 inches—to create wider, more gradual transitions. Many professionals use multiple knife sizes in a single repair project.
Q: How can I tell if my feathering is smooth enough?
A: Run your hand gently across the feathered area once it’s completely dry. You shouldn’t feel any ridges, bumps, or abrupt transitions. Shine a work light across the surface at an angle to reveal any imperfections that need additional attention.
References
- Best Weekend Projects — The Family Handyman. 2024. https://www.familyhandyman.com/
- Drywall Repair and Finishing Guide — United States Gypsum Company. 2023. https://www.usg.com/
- Professional Painting Techniques — Painting and Decorating Contractors of America. 2024. https://www.pdca.org/
- Home Improvement and DIY Safety Standards — U.S. Consumer Product Safety Commission. 2024. https://www.cpsc.gov/
- Spackling and Joint Compound Selection Guide — National Association of Home Builders. 2023. https://www.nahb.org/
Similar Articles


Read full bio of Sneha Tete


