How to Hang Drywall: Complete Step-by-Step Guide
Master drywall installation with our comprehensive step-by-step guide covering ceiling and wall techniques.
How to Hang Drywall: A Comprehensive Installation Guide
Drywall installation is one of the most common tasks in home renovation and construction projects. Whether you’re finishing a basement, remodeling a bedroom, or building an addition, knowing how to properly hang drywall is essential for achieving professional-looking results. This comprehensive guide walks you through every step of the drywall hanging process, from initial preparation to final installation. By following these detailed instructions and best practices, you can complete your drywall project with confidence and precision.
Essential Tools and Materials for Drywall Hanging
Before beginning your drywall project, gather all necessary tools and materials to ensure a smooth installation process. Having the right equipment on hand will make the work easier, safer, and more efficient.
Measuring and Marking Tools
- Tape measure for accurate distance calculations
- Pencil for marking measurements on drywall
- Chalk line for marking straight reference lines
- Straightedge or level for checking alignment and ensuring panels are plumb
- T-square for marking cutting lines perpendicular to edges
Cutting and Installation Tools
- Utility knife for scoring and cutting drywall sheets
- Drywall saw or spiral cutting tool for making outlet and fixture cutouts
- Rotary cut-off tool for precise circular or irregular cuts
- Cordless drill or screwdriver for driving screws
- Drywall lift for safely raising panels to ceiling height
- T-square for guiding straight cuts
Fastening Materials
- Drywall screws (1 5/8-inch for standard applications)
- Drywall nails for securing corner bead and trim
- Joint compound for finishing and mudding
- Drywall tape for reinforcing joints
- Metal corner bead for protecting outside corners
Measuring and Cutting Drywall for the Ceiling
Proper measurement and cutting is the foundation of successful drywall installation. Taking time to get these steps right will save you trouble during installation and ensure a professional appearance.
Taking Accurate Measurements
Begin by measuring the dimensions of your ceiling or wall space. If the panel doesn’t span the entire ceiling, its end must land on the center of a strapping piece or joist. If it doesn’t reach a support piece naturally, measure to the center of the farthest support piece the panel will overlap. Transfer that measurement to the edge of the first panel and mark it clearly with a pencil.
Scoring and Snapping Drywall
Once you’ve marked your cutting line, use a T-square as a guide to ensure straight, accurate cuts. Hook the T-square on the panel edge and place it alongside your mark. Using firm, steady pressure, score through the paper on the front of the drywall with a utility knife, following the T-square as your guide. Stand the panel on its edge and snap the waste portion away from the score line. Finally, cut through the paper backing on the reverse side to completely separate the waste piece from your usable panel.
Marking Fixture and Box Locations
Before lifting drywall into place, mark the locations of any electrical outlets, light fixtures, or ventilation elements on the sheet. Measure from the edges of the sheet to the center of each fixture and mark these points clearly. This advance preparation will save significant time during installation and minimize adjustments needed when cutting holes later.
Installing Drywall on the Ceiling
Ceiling drywall installation requires careful planning and often benefits from using a mechanical drywall lift. This challenging work can be made much safer and more manageable with the right approach.
Positioning the First Panel
With an assistant, hoist the first panel into one corner of the ceiling using either a drywall lift or manual positioning. The panel edges should be perpendicular to strapping or joists, and one end should be tight against the wall. If using a mechanical lift, position it under the installation area, place the drywall sheet onto the lift platform, then crank the lift to raise the drywall to ceiling height. Adjust the position as needed to ensure proper alignment.
Securing Panels with Screws
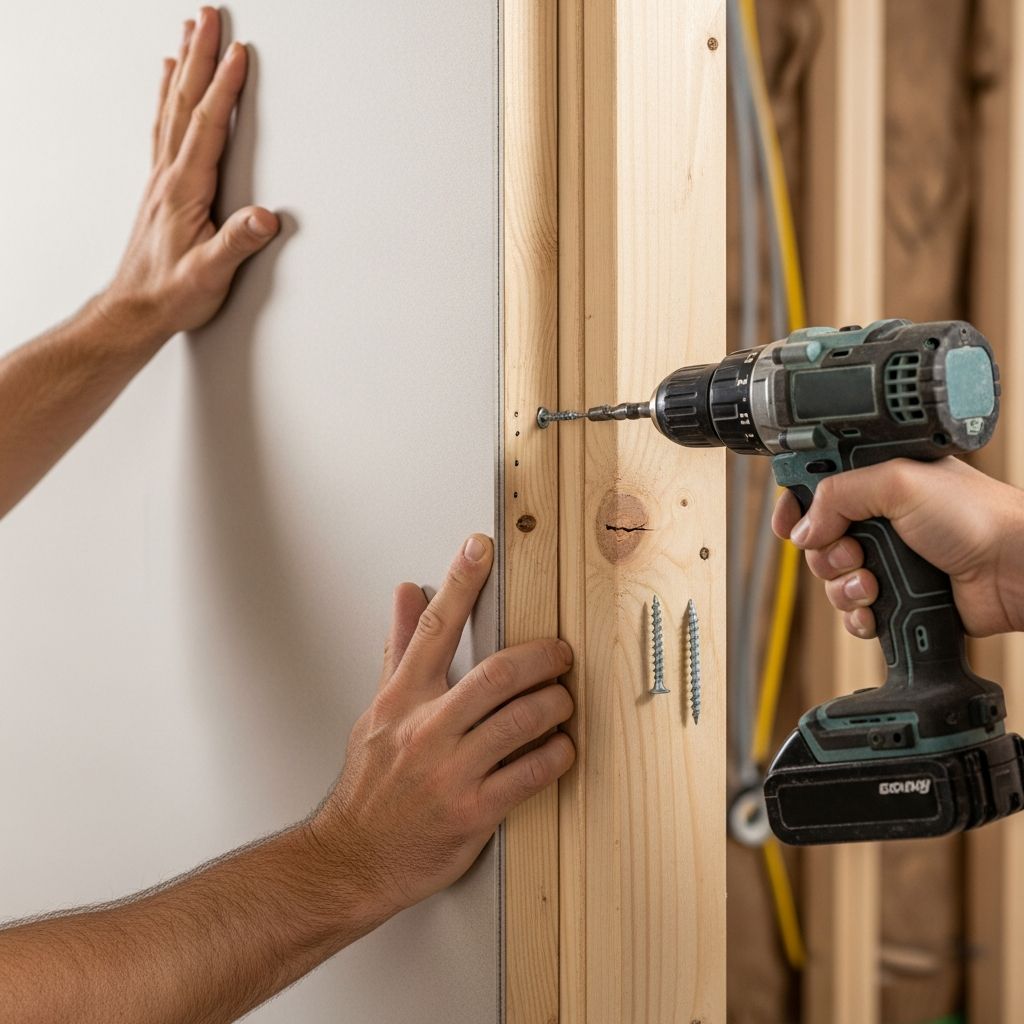
As your assistant holds the panel in position, drive five screws evenly spaced in a line across the panel’s width, securing into the joist or strapping closest to the middle of the panel. Use screw marks on the top plate to help align your fasteners. Keep all screws at least 1/2 inch from all edges to prevent damage. Drive screw heads slightly below the surface of the paper, but not so deeply that they break through the drywall face. Repeat this five-screw line at each joist or strapping piece.
Continuing Across the Ceiling
Continue the row in the same fashion until reaching the opposite wall. Start the next row, making sure all end joints offset the panels in the first row by at least four feet. This staggering prevents long continuous seams that can lead to cracking. If any screw head breaks through the paper, add an additional screw next to it to ensure proper support in that area.
Hanging Drywall on Walls
Wall installation follows similar principles to ceiling installation but involves some unique considerations for doors, windows, and electrical boxes.
Installing the First Course
Following the stud marks on your layout, drive a line of five screws through the drywall and into each stud. Start screwing into a stud close to the middle of the panel and work outward toward the edges. Space screws approximately 8 inches apart along each stud for consistent support. Continue hanging panels along the top of the wall, running them right over any window and door openings (excess will be trimmed later).
Offset Seaming for Strength
Make sure no seams line up with door or window corners, as this creates weak points in the wall structure. Don’t fasten panels to the framing around openings yet—you’ll secure these after trimming. Install the next row of panels by butting edges tightly together. On the bottom row, use a drywall lifter to pry the panel one-half-inch up from the floor to allow for the framing’s natural shrinkage over time. As with ceiling installation, offset end joints from the previous row by at least four feet.
Cutting Outlet and Fixture Boxes
Accurately cutting holes for electrical outlets, switches, and fixtures is crucial for safe installation and proper functionality. Mark box locations before covering them with drywall, being careful not to drive any screws closer to each box than 24 inches.
Step-by-Step Box Cutout Procedure
From the mark on the last installed panel, measure out onto the new panel the same number of inches you recorded previously, and mark the spot with an X. Plunge the bit of a rotary cut-out tool into the center of the X. Move the tool outward until the bit strikes the inside of the junction box, then withdraw it and plunge it back into the panel next to the outside of the box. Hold the bit against the box and move the tool counterclockwise around its perimeter until the cutout is finished. Once complete, drive the remaining screws into the panel, avoiding the cutout area.
Trimming Around Doors and Windows
Professional-looking trim work around openings requires precision and careful attention to detail.
Cutting Window and Door Openings
Hang panels over the bottoms of window openings, making sure seams don’t line up with the corners. Don’t screw panels to the framing around the openings yet. Use a cut-out tool or drywall saw to trim any ends and edges that project into window or doorway openings flush with the face of the innermost studs. Then screw the panel to the framing around the opening using the standard five-screw pattern, being careful not to place fasteners too close to the edges.
Final Panel Attachment
Once all trimming is complete, secure the trimmed panels to the framing with properly spaced drywall screws. Check that panels are flush and properly aligned before driving final fasteners. This ensures a clean, professional appearance when finish work begins.
Creating Inside and Outside Corners
Corners require special attention to ensure durability and a professional finished appearance.
Inside Corners
At inside corners, butt the end of one panel against the face of the panel on the adjoining wall. This creates a simple joint that can be reinforced with joint compound and tape during the finishing phase. Ensure both panels are secured to studs with the appropriate fastening pattern.
Outside Corners
For outside corners, install the first panel so its end is flush with the studs on the adjoining wall. Overlap this exposed end with the panel on the adjoining wall so that the corner is completely encased in drywall. This overlapping approach provides structural strength and a finished appearance. Cover outside corners with metal corner bead cut to the height of the wall. Trim each end to a 45-degree point and place the bead’s legs over the adjoining panel. Fasten the bead with one-and-one-half-inch drywall nails, hammered every 10 inches through the perforations in each leg so that the legs are tight to the wall and the corner is not distorted.
Common Mistakes to Avoid
Understanding what not to do is as important as knowing the correct procedure. Here are frequent errors that can compromise your installation:
- Over-tightening screws: This weakens the hold and damages the drywall surface. Drive screws only slightly below the surface.
- Failing to offset seams: Running seams continuously weakens the structure and invites cracking. Always offset by at least four feet.
- Improper screw spacing: Spacing too far apart leaves unsupported areas; too close wastes materials and creates weak points. Maintain 8-10 inch spacing.
- Placing fasteners too close to edges: Keep all screws at least 1/2 inch from panel edges.
- Installing fasteners near electrical boxes: Maintain at least 24 inches from box locations to avoid damaging wiring.
- Neglecting to stagger joints: Aligned seams create visible lines and structural weakness.
Pro Tips for Professional Results
Experienced drywall hangers follow certain practices that separate amateur work from professional installation:
- Use a drywall lift: Manual ceiling installation is exhausting and prone to misalignment. A mechanical lift ensures consistent height and reduces fatigue.
- Work with a partner: One person can position while another fastens, improving efficiency and quality.
- Mark studs and joists: Use chalk lines to mark stud and joist locations on the floor and ceiling for quick reference.
- Pre-mark all cutouts: Marking before installation prevents forgotten outlets and reduces rework.
- Check alignment frequently: Use a level to verify panels remain plumb as you install.
- Use consistent fastening patterns: Following the same pattern throughout ensures uniform support.
Safety Considerations
Drywall installation involves physical demands and potential hazards that require proper precautions. Wear safety glasses to protect your eyes from falling debris when working on ladders or scaffolding. Turn off power to any electrical fixtures before cutting. Use proper lifting techniques when moving heavy sheets, or use a mechanical lift for ceiling work. Ensure all scaffolding and work platforms are stable and secure before beginning work at height. Keep work areas well-lit and free from tripping hazards.
Frequently Asked Questions
Q: What size drywall screws should I use for ceiling installation?
A: Use 1 5/8-inch drywall screws for standard ceiling installation into wood framing. These provide adequate penetration for secure fastening without over-driving.
Q: How far apart should drywall screws be spaced?
A: Space screws approximately 8-10 inches apart along studs and joists for adequate support. On ceilings, maintain spacing along each strapping piece or joist.
Q: Can I hang drywall by myself on a ceiling?
A: While possible, ceiling installation with a partner or using a mechanical drywall lift is highly recommended. The weight and difficulty of positioning make solo work dangerous and prone to poor results.
Q: How do I prevent seam cracking?
A: Offset all end joints by least four feet between rows. Avoid aligning seams with corners of doors and windows. Use proper fastening patterns to support panels uniformly.
Q: Should I hang ceilings or walls first?
A: Generally, hang ceilings first, then walls. This sequence allows wall panels to support ceiling panels at the intersection and simplifies the installation process.
Q: How do I cut accurate holes for electrical boxes?
A: Mark box locations before hanging the panel. Use a rotary cut-out tool, plunging at the center mark and moving around the box perimeter. Pre-marking ensures accuracy and prevents mistakes.
Q: What’s the purpose of using a drywall lifter on the bottom row?
A: A drywall lifter elevates the panel one-half-inch from the floor, accounting for framing shrinkage over time and preventing base damage from floor moisture.
References
- How To Hang Drywall — This Old House. Accessed 2025. https://www.thisoldhouse.com/walls/21016619/how-to-hang-drywall
- How To Hang Drywall on a Ceiling — This Old House. Accessed 2025. https://www.thisoldhouse.com/ceilings/21017159/how-to-hang-drywall-on-a-ceiling
- Occupational Safety and Health Standards for Construction Work — U.S. Department of Labor, OSHA. Updated 2024. https://www.osha.gov/construction
- Building Code Requirements for Gypsum Board Construction — International Code Council (ICC). 2024. https://www.iccsafe.org
- Gypsum Board Construction Handbook — Gypsum Association. Updated 2023. https://www.gypsum.org
Similar Articles




Read full bio of Sneha Tete